1) Why I chose to make this costume:

I still remember how I played as a child to be Xena - this badass heroine, how I wanted to be courageous and righteous like her and fight against evil. She was with Hercules one of my fav characters and she had so much positive influence on me!
This project was simply a fullfilled dream of mine and I didn't make it to compete in any contest or appear on any event, I just made it to feel great and empowering.
2) Original character:


3) How I made this costume
As I've already mentioned in my article about Xena's sword and chakram, sometimes the more info you have about something doesn't have to be excatly positive for your working process - in other words - more doesn't mean better. I really struggled with different versions of Xena's armor, garment and sword and I ended up lookin at several different prop replicas of it. There are so many different versions!
You can either choose the parts of the costumes you like and combine them freely or tryto stick with one era od Xena's TV series and choose one stable version of her armor.
 But even that there are a slight different versions of Xena, the main armor is quite known and you can easily find patterns for all the pieces in different qualities. For example this one. Or you can use my patterning guide and design your own patterns!
And and advantage of this tutorial/article is, that I streamed a lot of my work on my twitch channel, so if you don't understand something, you can look at the video and see how I did it! Of course I didn't stream every single piece of this costume, but most of the parts are there!
ALL THE VIDEOS ARE HERE
And yeah, this was my base material:
1) Gauntlets and armbands
I laid my hand on the paper and drew a pattern in the shape of the gauntlet, I bend the paper in half, so both sides are symmetrical and then I drew the pattern inside.


I transfered the pattern onto an old leather jacket, cut it and sew around it.
I took a wooden breadbord, glued a baking paper on it and put the pattern under it.I cut a strap of moosgummi and wrapped it in black worbla and made border out of that (sandwich technique). I had some black worbla rests laying here and this was the perfect project for getting rid of them. I took the black worbla rests, heated them up and made triangular shapes, which I formed accordingly. I heated then the whoole structure and bend it around a stick to fit on my hand. I added holes, that I burnt into the borders with my wood engraving tool.
 I smoothened the gauntlet with gesso and latex cement, painted with black acrylic colors and bronze and gold color tapped on it with sponge. Then I took hot glue and glued the structure onto the leather base on few places. I added brass rivets I bought here, that went through the border and the leather base. Then I shaded the crafted parts with brown and black and I shaded also the leather part with dark brown color for leather by Artemiss. The gauntlets have no meansof holding on my arm, the are just there because of the strength of worbla - no lacing needed!
 I did the same with the armbands, only the pattern was rectangular and thsi time, I actually used a brown shoelace to make them hold better on my arm - I just poked holes wih my woodengraving tool inside the leather and inserted hole rivets there.

2) Pauldrons


 Pauldrons were made similarly - I drew first the armor decoration pattern on the paper
Modelled the worbla rests accordingly, drew the pattern of the leather base tracing the finihed worbla decoration. I transfered the paper pattern onto leather, cut, underglued the leather with moosgummi for better wearing comfort and more solid piece. I sewed around the part, added rivets and strap for the backside and eyelets.

 Then I heated the decoration, bended it to fit my shoulders and sew it on the place, added gesso and cement and painted.
On the backside there is an eyelet that goes to the back armor strap. On each pauldron is a leather strap that goes behind the neck so the pauldrons don't fall of the shoulders.

 In the front there is a bend leather so the wire decoration can be put through the front part. Originally I had there two rivers, but since the pauldrons wer not very fitting, I had to put out those rivets and shorten the pauldrons a little (The difference can be seen on pictures by Milos Mlady - longer pauldron with front rivets and Eugene Art - no rivets, shorter pauldron, better fitting),

3) Corset


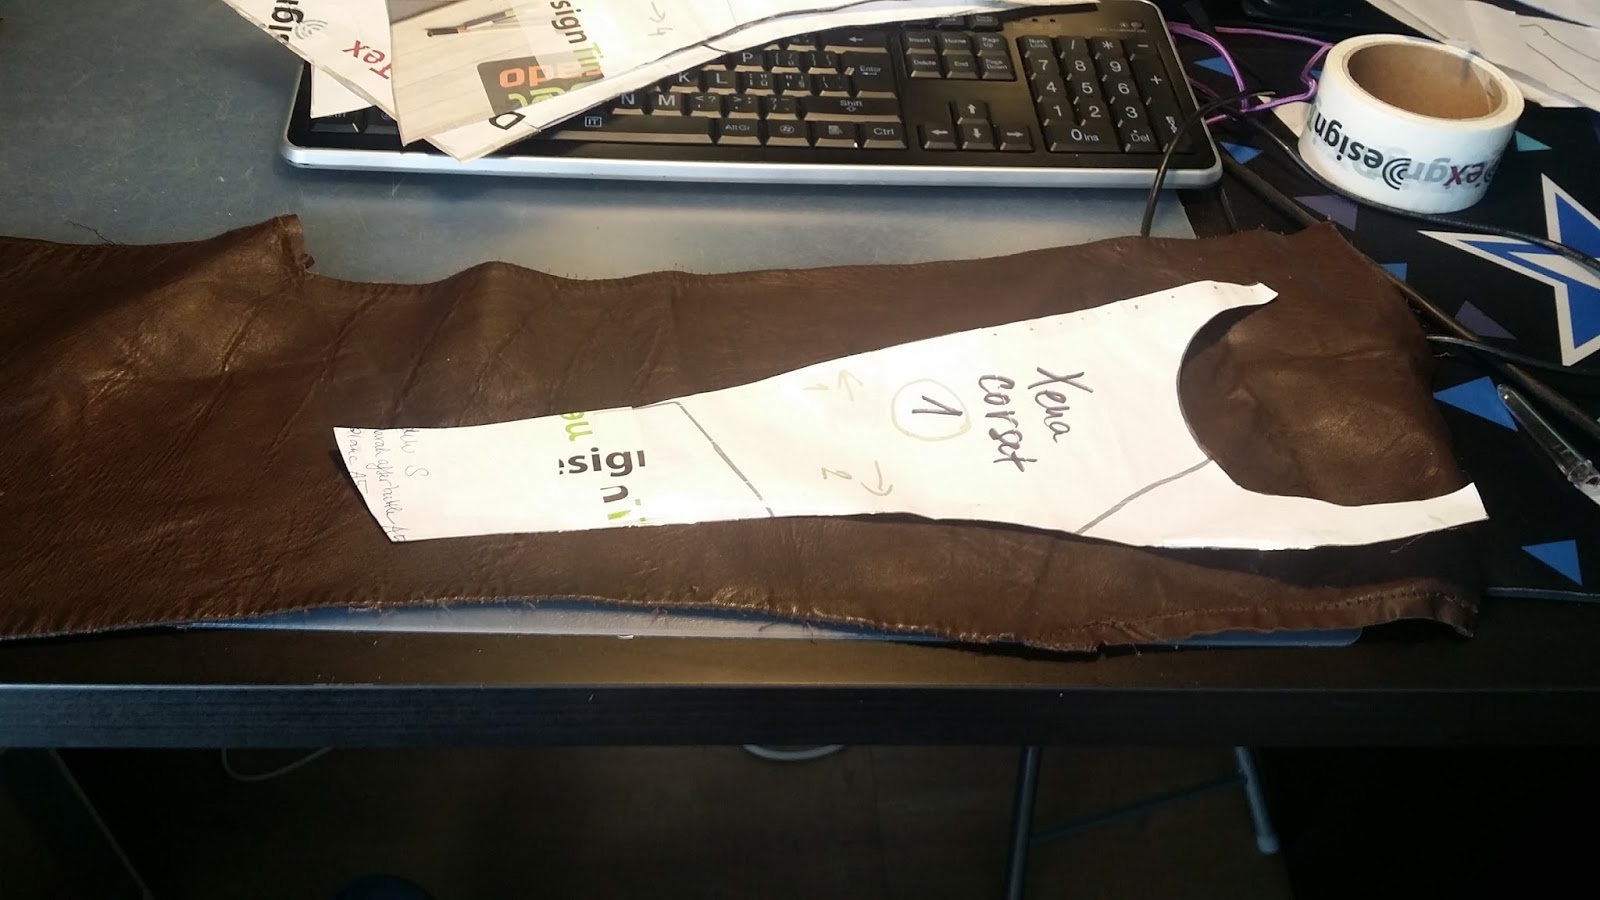


 I drawn a pattern on a paper and assembled it together with tape to try it on my body. When I was satisfied with the pattern, I transfered it onto leather from leather jacket I got in second hand store, then I underglued it with unvowen fabric and sewn it with other pieces in a double stitch, so you can put the plastic reinforcements into the seam. Then I cut it according to the marked patterns.
I made the same with the breast cups and I sewn them by hand into theirp lace on the corset. Then I handsewn all the borders inside the corset.
 I added the cprset decoration in the front and I made holes on the backside and put the hole rivets for lacing in there.
I added straps for the corset to hold on it'S place that go on my shoulders. I made the front and back eyelet fixed in a strong rubberband, so it is a little stretchy and it doesn't restrict my movement.
4) Skirt


 Skirt was kinda difficult to make - I had studied a lot of reference pictures in order to find out how many straps there are and eventually I made it like this:
 |
| color difference |
It is really important to lay them in two layers and let them overlay partly (like on the picture). On each top layer goes one riveted strap. Only in the front I put 3 riveted straps nexto to each other, since I've seen then on some referrences and I think it looks better.
 |
| layout of straps |
 |
| front part |
 The riveted straps are made from small leather scales, that overlay each other. I riveted them together and sewed all the straps into the belt, that I wrap aroud myself and fasten it with velcro and eyelets. I've encountered a problem by working on the skirt - I ran out of the original brown leather jacket, so I had to use another one, that had a little reddish shade into it, so I had to eventually take Artemiss leather colors and paint all the reddish parts brown - just with a brush, it was surprisingly easy - the outcome can be seen in the picture with straps layout.
5) Kneepads


 The work on kneepads was surprisingly very easy - I drew the patterns first and tried if they fit on my knee, then I transfered them on moosgummi. I added glued moosgummi details on top of this layer and glued a leather layer onto it. ¨Then I sew arounf the borders and around the decorations and this 3D effect was born. I painted the 3D parts with golden acrylic color, added straps, rivets and glued the two pieces together.

6) Back armor


 Back Armor is a swirly thing, that is holding to pauldrons and breastplate I started drawing my pattern on paper, cutting it out and transfering on foam. Then I dremelled the foam into the desired shape and coveredit in worbla with sandwich technique. I smoothened the borders with woodburning tool. Then I took the rests of the worbla and formed them into smaller swirls and attached them to the bigger ones.
I took my mannequin and I slowly heated the piece carefully so no bubbles pop out and formed the piece on my mannequin.
Then made holes with my woodburning iron on the upper side and on the side and soldered pins, there, which hold the leather straps. Then I applied gesso and cement and paint.

7) Breastplate armor
Breastplate armor was very tricky to make! I started with acrylic halfballs, that I sprayed with vaseline. I cut two pieces of worbla, heated them up and connected together and formed around the acrylic ball.I dres a pattern of the middle part on paper, cut it from 1mm foam and sanded in shape. I did the same with the swirls on the side and I covered all those parts in worbla too.
Then I took the both cups and I wrapped them partially in mossgummi, since there is a small border in the middle of the boobiecups on referrences.I took modelling clay, just a normal cheap modelling clay and I modelled the ornaments she has on the breastplate. I added three moon shapes in the middle of boobiecup made from moosgummi. I let it dry and then I covered it in one black worbla layer.
Then I attached all the parts together. I made small holes on the sides to hold to backarmor and I soldered a leather strap into it.Then I added a strap of worbla on each boobiecup, in which I made small holes with woodburning iron. I glued to that leather wrapping and added rivets into the holes, that hold also the strap, that goes into pauldron wiring. Then I primed it, painted it with sponge with bronze and gold color and that's it!

8) Corset decoration and pauldron wiring


 The decoration on the bottom part of the corset was made again out of the black worbla rests - I've drawn a pattern first on paper, put it inside baking paper and wooden board, heated up small pieces of black worbla and put into shape. Then I primed it and painted it and sew onto the corset.
I've used a really thick wire, that I formed with shears in the shape. To avoid the wire slipping away and to avoid the wire to be dangerous, I soldered little tin balls on the ends.
9) Wig

 To be honest I was lucky with the wig - the wig I bought was very cheap, and it required only minimal styling. It came wavy, so I had to straighten it down - I just spray the wig with water and straight it till the water is all gone.
Then I just curled the fringe a little and it was done. I added a braid, that was typical for Xena in early episodes.
The only disadvantage is, that the wig is a little smaller and I can't really put all my hair under it.
I bought both things on ebay and the price was 8 dollars for both together lol:
THE WIG and THE BRAID
10) Boots
Have you ever tried to find high laced shoes in brown color? It is just impossible to find!I was so desperate, that I ordered the boots from Aliexpress - I usually do not order clothes or shoes from Ebay or Aliexpress, but I had no choice, but they turned out perfect for this OMG!
The only disadvantage is it took very very very long to ship them. I waited several months for them and they costed 30 dollars - I've chosen the dark brown ones.
But if you want the same shoes as me, they are quite comfortable and they fit perfectly: BOOTS

11) Chakram
 Before working on your own chakram, please, check out those tips and tricks article with all the patterns included!.


 I've started with two thin layers (0,5mm each) of expanded polystyren, I glued them together with polystyrene glue (don't use chemoprene!). And I shaped them with dremel sander - I also made a little holes for inserting abalone shell inlays.
Then I sandwiched the whole thing in black worbla and I added the engraving with my wood burning iron. Then I hotglued the abalone shells inside the holes, I primed the wotbla, painted it with acrylic colors and I've used a little airbrush to make the inlays stand out more. And since I didn't mask the inlay shells, I scratched the paint from the shells afterwards. And to spare money and material - I even cut the shells in half, because it had two sides.


12) Sword


 I made a pattern in my computer with the help of the pictures on the internet, I transfered it on PVC layers, cut it out, added two polystyrene layers for blade and one laers for handle, cut that and sanded in the shape.
I covered it in worbla and I smoothened the borders/connections with woodburning tool.
Ten I took black worbla and I added a lot of decorations, that I blended with woodburning iron and I also added abalone shells - 3 on each side and one in the pommel - with worbla borders
I primed the worbla with gesso and latex cement (several layers) and I sanded them down with sandpapers and sandsponges and polished with water.

 Then I painted it with black base color, added long leather strap that I wrapped around the handle and painted with brown Artemiss colors for leather. Then I painted the rest with gold and silver Pebeo colors with sponge technique.
Do not forget to check my progress videos - there is a lot of progress shown real-time!
And here are some pictures of my done cosplay :)

 This article was made with support of my Patrons on my Patreon! There will be no time doing this without them!
I hope this article will be useful for someone and if yes, you can follow my work on cosplay (and other stuff) on my FACEBOOK PAGE or TWITTER or INSTAGRAM.
and if you like this stuff I do, you can support my work by donating on my PATREON.
Yours
Germia
0 komentářů:
Okomentovat