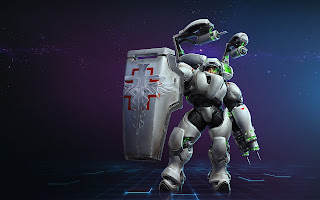
 When I announced Lt. Morales as my next cosplay, I didn't imagine how hard it would be to pull of patterns, that actually don't alling to my body. Lt. Morales is huge, like really huge - and her armor pieces are also really huge. We cosplayers are all used to making patterns on our own body or on a human-like figourine and we are used to several different techniques:
1) Taping your body to trace your curves and make the patterns simpler
2) Make patterns directly on your body/figourine and adjust them in the process of making.
I'm using both of the techniques in my builds, but I've always made patterns on a solid body mass, not just in the air to make armor that is so bulky as hers and that doesn't correspond to my body at all... So I was really struggling to make this one.
Good thing to do before starting your cosplay, is to make research and I always make research for different pictures, referrence materials or cosplayers, that made this cosplay before me. And I've found one, that made Lt. Morales too with using the 3D modelling software. And as I've used 3D modelling before I thought it could me fun to learn a new patterning technique and I can spare some time and her blog was a big help, but...
...I actually didn't spare a lot of time - when you're making something for the first time (even you have some idea how), you have to overcome a lot of different obstacles and problems you didn't expect, but I can SPARE YOUR TIME by telling you exactly how to do it!
 I
I I struggled 3 days with different programs and their versions, but thanks to the modding community, I was able to transfer the 3Dmodel of Morales through 3 different programs into a workable object and work on her in Meshmixer, disassemble her armor into pieces and make a 2D pattern out of it in Pepakuradesigner and mod the file into workable foampattern pieces, but step- by-step:
1) What you have to do first is to download free program called CascView HERE. This program allows you to download Blizzard model files into your computer. Open it in your computer, press Browse, find your installed game (in my case: Heroes of the Storm in C:, Program Files) and import data folder into the program. I found my Morales in mods/heroes.stormmod/base.stormassets/Assets/Units/Heroes/Storm_Hero_Medic_base and there you have your .m3 file that you need.
2) Then it starts to be kinda harder (sorry). The blog of the cosplayer I've read is using just a modding tweak for Blender to get this done, but it didn't work for me at all and it's not described as elaborately as you can possibly need as a beginner - but you can try it HERE.
But don't worry - I've figured out a way how to make it possible, even it is not without a struggle - You have to download/buy a paid 3D modelling software called Autodesk 3DS Max - I've used an older version of this software and I really recommend using version 12 or 13 more than going for a newer version. You can download the older version HERE and try it for 30 days for free. If you want to own the program forever, you have to buy a serial and product key.
I've achieved to transfer the file because of THIS tutorial about transferring .m3 files into workable pieces.
Don't be scared of how 3DS Max looks like, I don't understand it much either, but you don't have to work in this hard-to-understand program - this is just to make our model workable in Blender.Then you have to download Talyor Mouse's M3 Import script, that makes *.m3 files workable in 3DS Max. You can download it HERE.
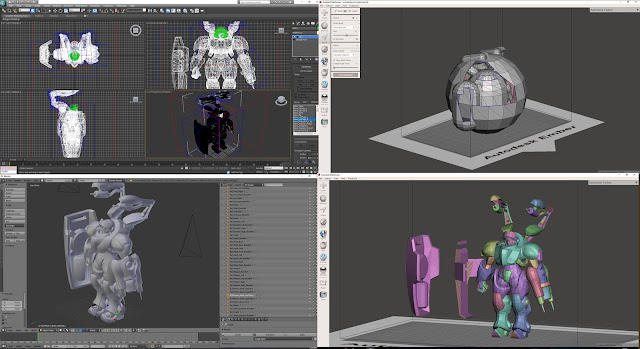
So when you have your Autodesk 3DS Max 12 installed, you have to open 3DS Max, click on MAXscript on the main panel and click Runscript In the new window, you'll see the script that you can run. Open it. Or you can just drag and drop the M3 addon the scripts folder in the folder where the program is installed. Then go to the right side of the screen, where the tools are diplayed, click on a small hammer icon (Utilities), choose MAXscript, choose M3 Import (v3.2) and select the .m3 file you want to import. Select your file and then check all the blank windows (bones, materials) to import all the file features into 3DS MAx.Then the model will appear in the program. Now you have to export the file as *.obj file by choosing the Autodesk logo in the upper left corner, click export, choose *.stl file, give it a name and click save.
3) Then you have to download a program called Autodesk Meshmixer - it is a free and really easy-to-use program for 3D printing. - download it HERE. It is a free software, where you can really easily work with the model and it is really easy to learn. Tbh there is nothing to learn, you need just the basics, that you can figure out yourself, try it, or watch my video below.
If you import your .stl file into Blender, your model will appear as a big pill or a ball. Don't be scared! It's perfectly normal - it's a hitbox texture. You have to select (use select tool) the textures you don't want to include in your build and delete them (click delete button on your keyboard).
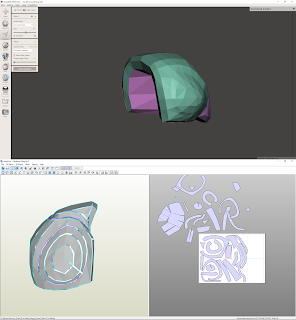
When you are perfectly happy with your build and only model without any hitbox textures is left, click Edit tool, click Generate face groups and the amount you choose will then make the same armor pieces into one color and will group them - so if you click twice on it, it will be selected as a whole. Then save your project. Now save your project once again with the name of the part of the model you want to make patterns of. For example pauldron. Now select all the textures that are not pauldron and delete them till only the pauldron is left. Then extract the piece in *.stl formate.
4) Next step is to buy and download program called Pepakura Designer 4. You can download it HERE. It is a program for making paper cutouts, so your perfectly smooth in-game model will be kinda pointy - you have to count with it and adjust it during the actuall cutting with the scissors later when your patterns are printed.
To unfold your model into 2D pattern, you have to click UNFOLD button on the top. Now the pattern looks really weird. It is adjusted automatically in Pepakura program to be the easiest to make from paper - so there are a lot of unlogically connected pieces, it has paper flaps, we don't need...
You have to then click on 2D menu, unselect Show flaps. Then click on underlined pencil button (Line Color) and lower the amount of edges (to aproximatelly 160 degrees - but it depends on the build youre making). The the whole work is up to you - you have to connect and disconnect pieces and think about how it will be best for your foam build. I'm actually making those last two steps in the video below!
 You can also name your parts so it is easier for you to orient in the different pieces. Also, think about the SCALE of your armor to fit your body - measure twice before printing out! You can scale it in 2d menu - change scale and I measured it to be the right size according to normal size of a A4 paper. Next thing you have to think of is the position of your pieces on the paper - always think about how it will be the easiest to cut, how it will be the easiest to glue together and how it will be the most eco-friendly - don't use unnecessary amounts of paper.
It is a really time-consuming technique, but I still think it will pay out in terms of how good it looks and in terms of how much nerves I spare with making up and remaking my own patterns, that could be really exhausting.
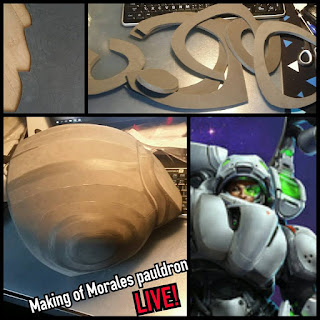
and as a reward I've thought this pauldron is one of the most universal parts of the cosplay, that could be reused for any other bulky or Starcraft 2 project - so here is a PEPAKURA FILE TO DOWNLOAD of my pauldron and FREE PDF PATTERN TO DOWNLOAD. Please, watch me working on my pauldron first before using the pattern, because cutting your foam in the right angle is the key feature of making good armor using pattern like this. Also - on the video, there is shown the outcome of the pauldron and it is really big! Scale it down if you think it is too big for you!

I've made this tutorial with the support of my PATREON followers. They allowed me to find time to make this elaborate tutorial and free to download patterns for you and with support of my TWITCH subscribers I can also share some videos of me working in those programs so it is much easiers for you to learn how to work with those :) Please, consider supporting me too, so I can make more tutorials and free patterns for you! <3
Also, visit my facebook page for progress pics and cosplay pictures!
Best of luck on your project!
Germia

0 komentářů:
Okomentovat