If you want to buy it, you usually receive a piece of a cheap thin and sometimes even see-through fabric, that is so small you can even wrap your body in it and the hood is too small for your head.
If you want to make it, a decent fabric costs a fortune plus folowing patterns is not always easy without a prior sewing knowledge.
I'M HERE TO SAVE YOU!
Because we're going to make a cape from two blankets, that actually looks good and believable without much sewing knowledge needed.


If you came here to recreate the exact cape from the Wonder Woman movie to the tiniest detail (screen accurate), my tutorial is not for you, because we are going to create a cape, that just resembles the one in the movie. If you want to make the screen accurate version, you'd need to use an expensive woolen fabric, very specific fur type and most importanly - a very different pattern, that is not that hard to sew, but harder to figure out as it is not very well seen in the movie. If you still wanna make a screen accurate cape, please follow this thread for more insight.
THE TYPES OF CAPES
First of all, you need to decide what type of cape you need to do. I've already shown in my Apollyon tutorial how I made a super simple cape from one blanket, but that one was very narrow and will fit just a certain type of costumes (the cape I selected for that costume was something between the first and the second type of cape on the picture)
Here's also a link to an interesting article about different types of capes you can make.


MATERIALS:
- 2x blanket

- Sewing gear
- Printer, paper (only for hooded cape), (black fabric for lining)
If you want to create a hooded cape, you'd need a printer, so you can print out my pattern for it. And if you want the hood to look cleaner, a cca80x80 cm piece of black fabric to put in the hood as a lining will do - I've used and old black skirt for this.
- Fake fur (only for Wonder Woman cape)
Fake fur can definitely be the most expensive part of this depending on which one you select. I've used just 40 cms of it on my build though, so it didn't hurt me that much financially. I bought a black llama fur from this link with a 30mm long hair (eventho if you have the possibility a longer one would look better, but I didn't have luck finding the exact fur type) in black color and the size was 40x147 cm. Ideally it would be great to have 160 cm long fur to match the blanket's length, but the fur I purchased was easy to stretch out without shrinking again, so I didn't really need to adjust anything, but even if you couldn't stretch out yours, there will be still some fur left to eventually use it as attachement or filler where needed (my leftover was cca 75x14 cm). For Wonder Woman cape, due to it's curly/messy nature matching the fur in the movie, I really recommend going for black llama/alpaca fur, ideally at least 6 cm long.

MAKING THE CAPE
Start with the first blanket. Lay it like on the picture, fold cca in 1/3 of the width on one side, and on the other side of the width fold cca in 2/3. The shape of the blanket should look like the one on the picture. Cut in the fold and sew together, so the longer sides are touching and the shape is mirrored. This will create the back of the cape.


Then lay the second blanket folded in half (fold is on the shorter side of the blanket - width), lay the hood pattern in one corner next to the fold and then cut along the line going from one corner on the fold to the other side just to leave space for seam allowance (usually half inch/cca 1,5 cm) around the hood pattern.
Sew the shorter side (the one on the left on the picture) of each of the created panel to the back of the cloack created from the first blanket.

Now pin the base of the cloack to your mannequin. You need to adjust the size of the cape around the neck and shoulders. You have 3 options how to do it:
1) Make pleats (that's how I did it)
2) Sew the front and back together forming the cape around the shoulder (on the pic)
3) Fold the top of the cape to create a tube for a strap and tighten it around the neck with a strap (you can have a strap even if you've selected option 1 and 2, I eventually added a strap in my cape too)


Transfer the hood pattern on the fabric and cut the fold. Even it seems like I didn not create seam allowance in front of the hood, please, create the seam allowance around the whole pattern.

Sew the hood pattern sides together (just the big rounded shape one the left). If you wanna line the hood, take a different fabric, transfer the pattern onto it making the straight side 1 cm shorter, sew together and insert into the fleece cape, so the undersides of both pieces touch. And as I wanted to be sure the lining sits properly, I've sewn those two fabrics together through the main seam with a decorative stitch. Then I've folded the fleece fabric over the lining fabric on the outer side (the straight side) and sewn in place. Folding should be possible thanks to the lining fabric being slightly shorter than the fleece. Then pin the hood to the cape like I did on the pic and sew in place.


I decided to kill two birds with one stone and added a tunnel for the strap, which serves as an elegant cover of the seam connecting the hood to the cape. It is an optional step, but it will sure make a lot of difference in the overall look and feel of the cape. To make the tunnel, take the rest of the fleece
fabric from the second blanket and cut out a rectangle shape, that is long enough to cover the seam around the neck. Fold it around the seam and sew in place. Run in a cord or a string using a safety pin. The cloak should look like this now:Now the course of action will differ depending on what type of cape you wanna do:


1) I am doing a generic cape, not Wonder Woman's cape:
You can now just cut the bottom of the cape to the desired round shape (I left the back a little pointy on mine -you can literally make any shape, but rounding it up will create the classic shape you probably look for) and overcast the front and bottom of the cape (fold it inside and sew in place).

2) I want to create Wonder Woman's cape:


Now we will add the fur.
Be careful by buying fur, because the orientation of the hair might create a weird effect on the cape. Each fur's hair behave differently and lays differently, but it is important to keep that in mind, since you might end up having to buy more than 40cm like I did, but the whole length needed (160 cm).
I did buy only 40 cm, took a risk and it was fine - first of all the fact, that the grain of the fur ended up being horizontal on the cape, helped me to stretch it slightly using the grain (imagine a knitted welt and its stretch). The hair isn't really having a laying position as it is all over the place, so it didn't really matter it wasn't laying "on the grain" down.
I bought 40cm wide piece of fur, which I divided into 3 straps, so each one was 147 cm long and cca 13,5 cm wide. Two of them will be used on each side of the front, one will be divided and used in the cutouts.
Be careful by cutting fur! Always use a sharp knife and cut the fur from the backside - it will damage the least amount of hair that way. Do not use scissors, or you would end up having a lot of hair fallout and the fur will look "shaved" on the sides.


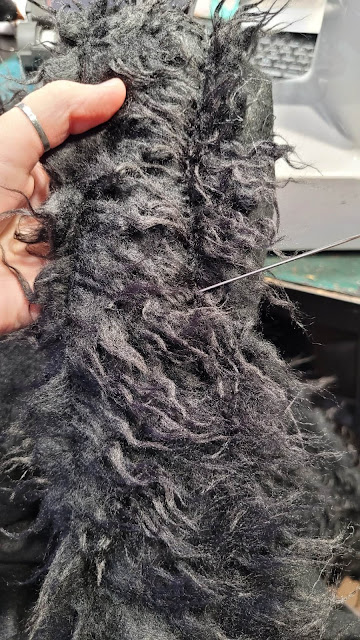
As you can see on the picture, the fur is pinned on the front of the cloack and it will be folded around the front edge. Sew in place and then use a blunt needle or something pointy to fluff up the fur again around the seam. When sewn in place, fold the edge of the fur inside, so it looks better around the neck. You can sew the fold in place, but mine hold just folded in like that.

Then cut the bottom of the cloack in shape and overcast.


As a last step, divide then last 13,5cm wide and 147cm long strap of fur into two 40 cm long segments and cut these in half leaving cca 7 cm width for each. Fold those around the arm cutouts and sew in place. Don't forget to fluff the fur around the seam again. And that's really it! You're done! If everything worked out, youre cape should look like this:


0 komentářů:
Okomentovat