
CHOOSING THE COSTUME
The reason why I decided to create this cosplay was the absolutelly awesome design of the Samurai jacket V has in the game. An since that was the focus of my work, I decided to go easy on the other parts of the costume, recreating a version of my own V from the game while taking inspiration from official promotional pictures.
I really loved the idea of lighting up the back part of the jacket as seen on the version made by Alžběta Trojanová, so I decided to take inspiration and include it in my jacket as well.
ORIGINAL CHARACTER
 |


MAKING THE COSTUME
See the instagram collection of how I made this costume HERE.
1) The wig
Even though the default version of V from the game already looks pretty badass, I decided to create my own in game in a different style wearing a dark green bob with matching makeup and that's the one I chose to embody.
I've found a perfect color for very cheap here.
. The wig is very soft, but the bangs extremely thin and required additional hair to have a decent form, so I've sewn an underlayer of black fake bangs inside - see my instagram higlights for the inside pics. Since the wig itself consists of different colored hair (green, dark green, black), the black fringe/bangs did not stick out in any way.
I've cut the wig slightly, otherwise it was perfect for my cosplay already.


2) The trousers + accessories

I decided to reuse my gun, boots and armor I've created for my other cosplay of Johnny Silverhand. I described the process of making them in great detail in THIS article. I downloaded the file for 3D printing the gun HERE.

4) The jacket
Before I even started working with fabric, I've 3D printed all the needed hard part for the jacket structure and decorations - sleeve buttons, small decor and collar base - from stl files I bought on Etsy (the same files are unavailable, the seller upgraded the files, so they look different than mine) Then I glued the collar parts together, and measured, traced and cut out the space for the Samurai logo in the back.

At the same time I sanded down the printing lines on all the visible 3D printed decorations, sprayed them with plastic primer and filler and this process was repeated till the surface was smooth and ready to be painted (I will talk about the masks later in this article).

If you don't know where to start by a big sewing project like this, now worries, I felt the same! First of all - look at the garment you're supposed to make and name it - in this case we are making an ordinary bomber jacket with some extra embelishments. So I decided to search for available patterns on the internet and compare them to the cut of the jacket in the referrences, because they might be very different even they look similar and are called the same - look especially at the seamlines of your referrence and the pattern (compare the pictures of two bomber jacket patterns and look at the difference in the attachement of the sleeves on the body part of the jacket).
 |
 |
Material is the second hardest choice you have to make, but for me, it was easy this time. I already knew, which material I wanted to use for this project, because I've already used it in my Megari from Horizon Zero Dawn cosplay before. It is a fake upholstery leather with a thick but mauable felt on the inside making the material sturdy but comfortable. The look is called "grinded leather" and the color is light-medium neutral brown. It can be obtained HERE, but I bought it in person from their fabric shop next to Hraničář in Ústí nad Labem (Czech Republic) HERE.
I started by printing the pdf pattern, gluing it, measured myself and cut my size from it, which I transfered to the fabric. I think I needed around 3 meters of fabric for the whole jacket. Then I cut the shapes and sewn the base parts together.

I've glued the seam allowance on the inside to the side and in this case it is important to have enough of fabric in there, because we will add a decorative seem on the side and more fabric allows us to reinforce the jacket and have a steady seam and pleasurable sewing experience later.

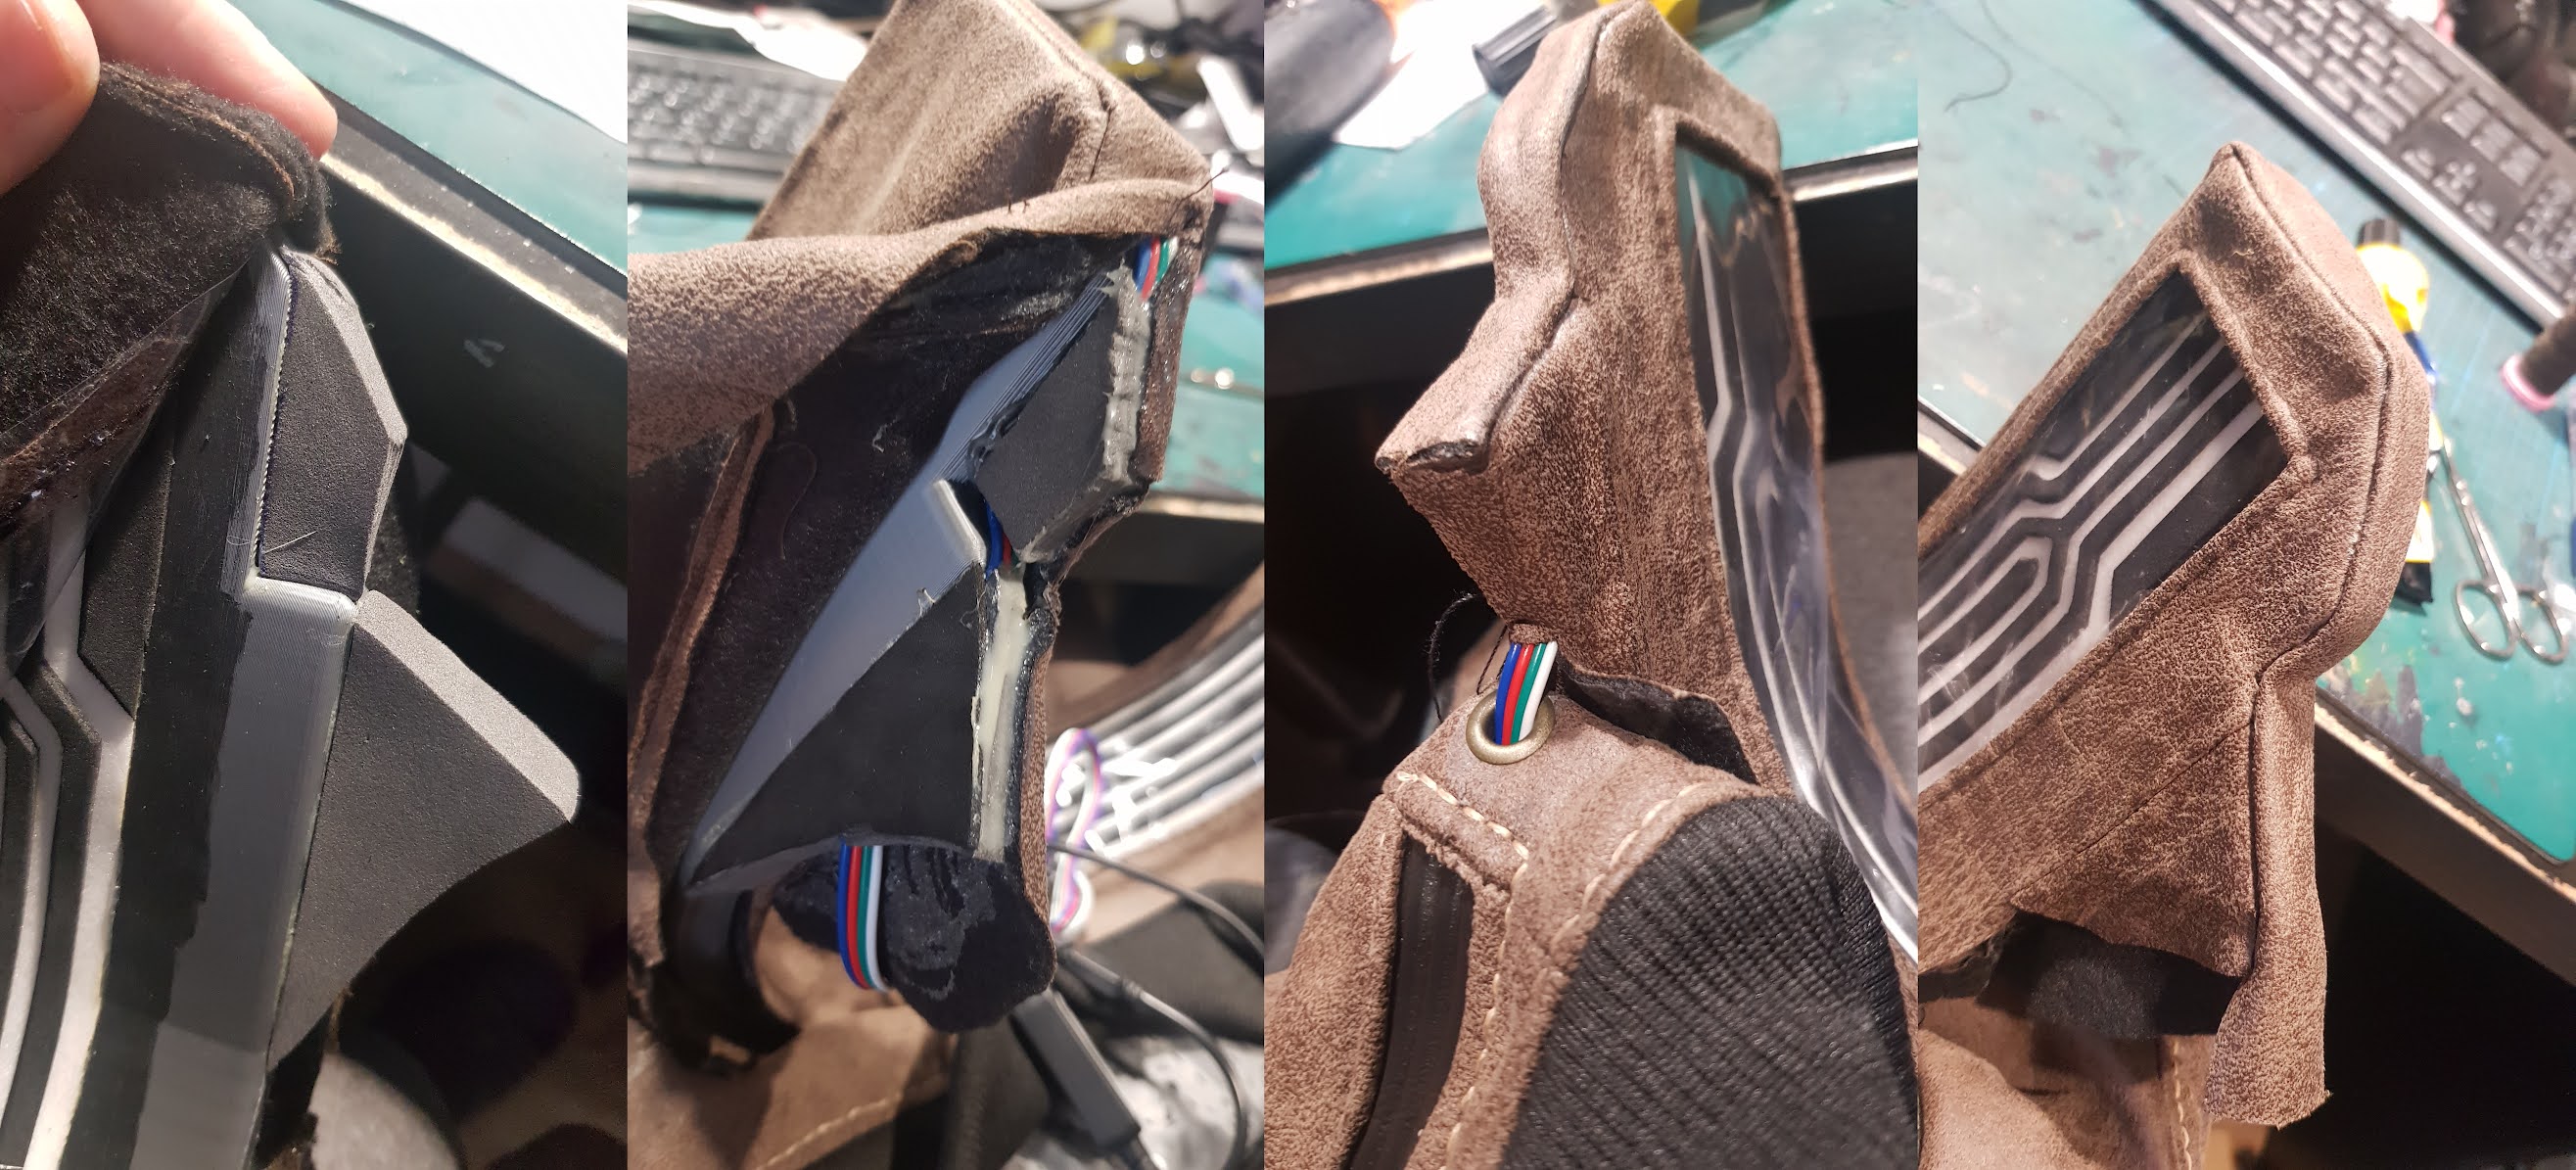
Before I continued the sewing any further, it was time to apply the Samurai logo on the back of the jacket. I did it at this stage, because it was easier to lay the fabric flat before sewing any further. You can also do this step later - it will be harder to do, because laying flat the finished jacket is impossible, but you will have much better understanding of where is the logo supposed to be. In my case, I've used a pattern I had already prepared for Johnny Silverhand's guitar, I've transferred it onto the jacket, and since I wanted to make the logo light up, I decided to not paint it, I've cut out using a knife and small sharp manicure scissors to make space for foil with electronics later.

With hindsight though, I'd probably reconsider the size of the logo, because I made it unnecessarily bigger than the referrence and I've had some problems fitting the left shoulder embelishements at the end when the jacket was finished because of the shear size of the motive. It is also much easier to paint the logo than creating a light up interactive one, but for that, I'm happy, because it makes the jacket special.
When I cut out the whole backpiece, I've used a bigger A4-A3 sheet of thicker foil (for storing documents, paper), sanded it down to make it more matt, so it disperses the light better and glued it using very hot glue gun to the back of the jacket. And if you had doubts about it being enough, I have to admit I had mine too, because adhesion to a foil is always an issue, proper sanding is totally necessary, but I sanded only from the inside to get the matt effect and wanted the foil shiny from the outside, so it would be either a very precise and time-consuming work, or I had to figure out a more stable way than glueing.


Next problem: It looks ugly. I've solved this issue by using black latex (for socks anti-slippery dots) and filled out all the borders with black latex, which covered the thread and looked kinda cool when it was dry.
And how did I install the lights? It was one of the last steps I've done when the jacket was almost finished, but the whole process is described in THIS ARTICLE.
Sleeves
Let's go back to sewing.
As the next thing I added the sleeve borders from stretchy knitted fabric, that you can already buy prepared for sleeve ends and jacket bottoms. It's described very well in the pattern - I've never done this before and I was still able to measure it properly, cut it out in proper size (a wee bit smaller than the sleeve end circumefernce), sew it to create a tunnel shape, fold the seam in and make it twice shorter and then stretch it, attach it to the sleeves and sew in the sleeves.
As the next thing I added the sleeve borders from stretchy knitted fabric, that you can already buy prepared for sleeve ends and jacket bottoms. It's described very well in the pattern - I've never done this before and I was still able to measure it properly, cut it out in proper size (a wee bit smaller than the sleeve end circumefernce), sew it to create a tunnel shape, fold the seam in and make it twice shorter and then stretch it, attach it to the sleeves and sew in the sleeves.

When turned upside down, it should look like the proper and well known ending of the sleeves. Btw. I've made the sleeves a bit shorter ending about in the middle of my forearm, because they are worn rolled up, but it might be hard to roll up the sleeves by a sturdy fabric like this.

The last step was to reinforce them with a handsewn seam, which is on the referrence pictures. I've used a beige thick waxed leather thread for this and backstitch, it was very time-consuming, but it added a lot of character to the whole jacket.

Then I took the body of the jacket, sewn the front and back panel in the shoulder area together, shortened my jacket to the area, where my trousers usually end (between hip-dip and top of the pelvis), which in hindsight is a bit short to wear any jacket in a functional and comfortable way, but it kinda matches the shortness of the jacket in the referrence. I added the sleeves in the armholes according to the manual in the pattern and I was very happy with the fit. Next step was to attach the "button" decorations to the top of the sleeves.
The buttons were 3D printed with other decorations needed for this jacket as mentioned in the article. I've sanded them and used a filler to smooth them out perfectly. Then I painted them black with a spray acrylic and then used a dark metallic color used for Škoda cars repairs. It's very nice and very reliable spray color. Then I've used black acrylics for the creases a bit and the buttons were finished.
Then I sanded down the lower outside of the buttons, because they are half-covered in the fabric. I've used paper to trace the shape of the button outside and cut it out of the fabric. Then I shaved the upper part of the fabric inner fluff to better "merge" to the buttons and to insure there is not step between the 3D printed part and fabric. Be careful with shaving and do this only if you are using a very thick fabric.
I've glued the fabric to the button using chemoprene glue and tried to perfectly match the seams, so they are even and straight.


The last step was to cut the bottom excess part of the fabric and create a flower shape, on which the button will sit in the jacket. Next step was to measure the placement of the buttons by placing them on the jacket and marking their ideal spots. Be sure to use also a measuring tape to ensure they are placed evenly apart from each other. I've measured the bottom size of the buttons and cut matching holes inside of the sleeves, where I eventually inserted the buttons. Then I've used a combination of chemoprene and hot glue to fasten the buttons inside and I was very pleased with the result (the jacket backlogo is not yet reinforced with sewing and latex on those pictures)


The zipper
I've created the flap by folding a thick strap of fabric, matching cca 4/5 of the length of the frontal part. I've marked the quilting lines according to my measurements and the amount on the referrence and sewn the quilt by hand with the leather thread. Then I took a hard black thread and I've sewn it in through the edge of the black fabric and zipper and fixed it then in the position with the beige thread.

Next up was the addition of the neck border, which was created in a similar way to the waistband and sleeve borders following the instructions from the pattern. I've created a moon like shape from the knitted fluted fabric, which I've sewn into the neck area. Then I've added the beige thread around the neck and that's basically the base of the jacket finished.

As we have prepared a black leather base for the fake zipper over the functional zipper, it was time to add the fake one. I've measured how many pieces would be needed for the zipper, 3D printed them, sanded and primed them and painted them. If you are working on small pieces, it might be very time consuming to work on one by one, so I tend to use a sturdy paper with double sided tape, where I stick those multiple pieces and sanding and painting is much faster. Those pieces were painted with the same dark metallic color as the buttons and glued to the fake leather base using a high-quality second glue.
To be honest, I'm very satisfied I can close the jacket with the functional zipper underneath - I know it's mainly opened - I just wanted to add a additional functionality to a made up garment, but if I would create the fake zipper again, I would probably rather make the individual pieces a bit smaller, cause they look very chonky on my jacket and they don't lay well on the jacket when is closed.
To be honest, I'm very satisfied I can close the jacket with the functional zipper underneath - I know it's mainly opened - I just wanted to add a additional functionality to a made up garment, but if I would create the fake zipper again, I would probably rather make the individual pieces a bit smaller, cause they look very chonky on my jacket and they don't lay well on the jacket when is closed.


The side lines
The plastic lines on the sides were an enigma for me for a long time. Should I cast them? - very expensive considering I'd need the material just for this one project and the molds just for this one jacket. Should I maybe cover some thick wires in shiny faux leather fabric? - very unpractical and time consuming. But then I thought maybe it can look good, when I make it out of foam - it's a very basic solution, but with the right primer, it can be very shiny, sturdy and flexible.
I started by drawing a shape of it on the jacket with a garment chalk, then I transferred the shape to masking tape. I've taped the shape from the masking tape on the 2mm foam and then I cut 3 tiny straps from 2mm foam, which I've sanded down on the sides and glued to the base in the desired shape. The ends were sanded down to better fit to the jacket. I've applied a lot of layers of HexFlex primer by Poly Props creating the super shiny plasticy look while giving the foam much more flexibility. The last step was to underglue the foam with fabric for an additional sturdiness preventing any tears of the foam.

The jacket was then cut in the middle of the drawn lines leaving the sides to be flipped inside to create a nice border. Be careful to cut the edges slightly in the curves, so you can bend the fabric in those places more easily. I originally started to sew around the borders from the top, but quickly realized, that even when pinned down, the fabric and foam shifts slightly with every stitch, so I recommend to start sewing from the middle part, where the foam is turning, so the fit is perfect. Stitch the foam to the jacket on both sides.


As a base, I've used a 3D printed piece,which I glued together with 2 part epoxy glue for plastic and since it will be only on inside, there was no need of sanding. I cut out the back part for the light to come through and added a paper with Samurai inscription, where I reinforced the opacity of the black parts with acrylics. More about the inner construction of the collar can be found in my LED lights article HERE.
I'm gonna describe the construction of the outer sleeve and the attachement to the jacket: I've traced the shape using a masking tape and transferred it onto a fabric.

Please, do not make the same mistake as I did and make the bottom part of the "collar sleeve" much bigger, so you have enough fabric to connect it to the jacket. I had to add fabric here and there later, which doesn't look very aesthetic and isn't accurate.


I cut out the parts from the fabric and sewn a sleeve for the collar base from the faux leather fabric. With the help of the tape I've traced the shape from and cut out a small window in the back. Do not forget to leave out enough fabric in the window to fold it inside and create a nice border like that.

Then I've also sewn and glued in a matte transparent foil used for paper/documents organizers and together with the paper, blacked out borders of the inscription nad the window in the collar base, the light comes through only in the places we want (white inscription).

And if you've read my article about phone-controlled LED lights, you know how I did the inner construction, and that I had to remake the lights to get a brighter outcome.
I cut out the inner part of the collar sleeve, inserted, glued and sewn in a huge document/paper storage foil which was a little too soft for this purpuose, unfortunatelly I wasn't able to find a sturdier one. Be sure to leave out enough space in the inner par to fold the borders around the foil and sew it in.
I cut out the inner part of the collar sleeve, inserted, glued and sewn in a huge document/paper storage foil which was a little too soft for this purpuose, unfortunatelly I wasn't able to find a sturdier one. Be sure to leave out enough space in the inner par to fold the borders around the foil and sew it in.

A very tricky part was to glue the collar sleeve with foil onto the base, which I find very important for the overall fit. I've used hot glue for the upper border and foil borders and chemoprene glue on the backside. Be very careful not to touch the foil with the glue, you won't be able to fix it! Then I've tried to just position the collar on it's place and due to the non-curved and very flat bottom side of the collar, it didn't really fit well, which I didn't really consider when making it.
I've fixed this problem by adding a few pieces of foam on the bottom in the ftont to make it curved and to better adhere to the jacket, but I lacked fabric to cover them, so I had to frankenstein pieced of additional fabric to those places, which are bothering me, because if I thought about attaching the collar to the jacket before, I would have left much more fabric on the bottom and I would have enough, so please, do it! And as tight sewing in those places was almost undoable, the bottom part of the front fabric is glued to the base.
I've fixed this problem by adding a few pieces of foam on the bottom in the ftont to make it curved and to better adhere to the jacket, but I lacked fabric to cover them, so I had to frankenstein pieced of additional fabric to those places, which are bothering me, because if I thought about attaching the collar to the jacket before, I would have left much more fabric on the bottom and I would have enough, so please, do it! And as tight sewing in those places was almost undoable, the bottom part of the front fabric is glued to the base.
I had to solve the same issue of the collar being too flat on the back of the jacket too. I had to add a round piece of fabric to better accomodate for the round shape of my shoulders, so the collar doesn't pull the fabric too much. It was probably the hardest part of the whole jacket project, to sew to collar in place and I had to redo this a few times till I was satisfied. Luckily my fabric is accomodating the holes from previous sewing pretty nicely and they are not visible, but most of the fake leather fabrics will not be so error-friendly. I started with sewing the outside part from the center and continued to the sides and stopped in the area of shoulders. The inner part is glued as well as the frontal part using chemoprene glue, because those areas became very hard to access properly in the process.
Sleeve flaps. decorations, pocket
The final step of creating such jacket are all the different embelishments and little details it has from inscriptions, badges, pockets to different electronics and implants. Since I didn't like most of the badges, patches and details from the referrence, I decided to add my own, starting with a metal V patch sewn to the left sleeve instead of the referrence's red and blue skull. I thought it looked very good and matched the style of the jacket more than the original patch.

I also added buttons I got from the etsy file with 3D models, which needed to be sanded down and primed before I could even paint them. I did the same steps as with the buttons on the sleeves and zipper parts, then I sanded the bottom part, so it will adhere better to the fabric and glued it to the front of the collar using superglue.
Sleeve flaps. decorations, pocket
The final step of creating such jacket are all the different embelishments and little details it has from inscriptions, badges, pockets to different electronics and implants. Since I didn't like most of the badges, patches and details from the referrence, I decided to add my own, starting with a metal V patch sewn to the left sleeve instead of the referrence's red and blue skull. I thought it looked very good and matched the style of the jacket more than the original patch.

I also added sleeve flaps and a pocket to the right sleeve using mainly fabric scraps like pieces of black leather I had laying around from other project and smaller rests of the fabric used for the jacket. The flaps have the brown fabric from both sides, borders are covered with black leather and I've handsewn around it for neat look. The last addition were several 3D printed ractangles. The pocket was originally meant to mimic the pocket on the referrence, but I eventually thought of using it for the battery pack/powerbank, so I've created a hole with a grommet inside, which serves as a vent for the electronics/wires.


Talking about electronics, I've described the whole process of installing the electronics in THIS article
On the collar, there is also a plasticy/silicone decoration, which I wanted to implement and since I had good experience with the previous use of foam, I decided to go in the same direction here too. I've started with masking tape, on which I've drawn the desired shape, transferred it to foam, sanded down the edges and sealed it with Hex Flex sealer. I've done the same for the shoulder decorations and glued both tothe jacket using chemoprene glue.


Last addition were wires going from the implant into the collar, possibly powering the jacket up, but again, I've used 2mm foam as base and thin foam lines sanded down to roundness, which will mimic the wires.

Last touches involved paitning all the foam parts lightly with a dark metallic silver color to better match the color used on the 3D printed pieces, painting an inscription on the back implant and adding a few 3D printed rectangles under the implant and on the collar.

The finished jacket:

5) The mask + glasses (optional)


Another addition I decided to implement were the RGB LED glasses, which I bought pretty cheap from Aliexpress. They are such a nice addition to the costume, especially if you are seeking a futuristic look and don't have much time/money/will to work with other electronics. They are not the best quality and I wouldn't recommend wearing them for longer than a few minutes, because after 2 hours of me wearing them with LED lights on on the stream, my eyes got super red, tired and irritated, but they do their job pretty well on photoshoots or occasional wearing. They have steady, blinking, rainbow lights adjustable with a button on the sides and they require 2 pieces of 3V batteries.

And here are a few pics of the whole costume. Hope you like it!


I hope you like my turn on this character and my guides will help you create something stunning!
If you happen to use some of my patterns/models/files/ideas, don’t forget to give credit!
If you like my work and you’d like to see more articles and tutorials like this, you can support me on my PATREON PAGE
because donations of my patrons made this tutorial possible.
Yours
Germia


0 komentářů:
Okomentovat