
Next level in cosplay wings are moving wings or articulated moving wings. If you can controll the movement of your wings, it is something unique and very hard to achieve.
 Construction of harness
There are many ways how to fasten your wings to your body, but the easiest way is to make a backpack-like harness. There are really a lot of ways, some people make a harness from pvc, but I've used a simple black old backpack. I've just cut the front part of the backpack out and used only the polstered backside, that lies on your back with shoulder straps. I've added two straps in front to connect shoulder straps in the front too - it connects them between th neck and the breasts and the second added strap should be connected under the breasts.


I bought a solid piece of wood, that I cut in 3 parts - the biggest part would be connected to the backpack and the two smaller parts were fastened to the bigger part with metal connectors and establish the angle between the wings.
Here you can find some tutorials for wing harnesses:


1) PVC pipes and flag holders
2) Mini backpack harness
3) Articulated wing framework
4) Custom wing shell

Wings - materials and process of making


First, there was a struggle with shape and size, that I already described in my article about patterns for Pharah. You can download the wings pattern from there!
I was wondering how to make the wings strong, but light, and I thought about a lot of materials including thin balsa wood or plywood, but I couldn't find a good balance between strong-light-cheap-big enough material. And as I wondered through a hobby store, I thought about using the see through material used for greenhouses made from two plastic sheets, that are hollow inside. Simply a material, that would be totally suitable for flying, because it has similar structure as bird bones. The material is strong, big-enough for four wings, it's kinda more flexible that I need (it makes my wings a little wibbly-wobbly sometimes) and it's really really light. It makes the core of my wings and then the wings are covered in 0,5 cm thick EVA foam from one side and a craftfoam from the other side. The edges are covered in craftfoam too and they're dremmeled for a better, smoother shape.


And as the wings are not only 2D, I've used a polyystyrene to make a base for the jet engine 3D shape.I've cut stripes of 2cm thick XPS hardened polystyrene and tried to follow the engine shape on my paper pattern. I connected the XPS pieces together with hot glue and then I glued it also to the foam of the wings. The I sanded it till it was even. And this served then as a base for the 3D jet exhausts on the wings. I equiped the end of the polystyrene pieces with velcro, beause I wanted to insert the led lights inside of the exhaust later and you have to be able to open the exhaust and exchange batteries when needed.
Then I took a paper and traced the needed parts to cover the polystyrene cants, I cut them from foam and covered the sides with it. Then I transfered also the pattern of the cover of the exhaust, that I had printed out, on the foam, cut it out, equipped the ends of the foam cover with velcros. Everything is dremmeled to be smooth and round :)


I also made a cover from 1cm thick EVa foam for the bottom of the wings, where I cut a hole for the screw holding the wings on it's place. Then I made small covers from EVA foam and craftfoam, that are fastened to the wings with velcros again and cover the top and the end of the screw.


Propulsion
I saw a lot of movement in cosplay propelled by servos and for this project I would have needed two huge servos, that would be really expensive and there would be no way I could hide them on the sides of the wings. Servos are the most common way how to propell wings - they're compact, small and strong and somewhat affordable.But even servos are affordable, I would need servos so big and strong, that it would cost me a lot of money and as I'm always trying to go the cheapest way possible, I wanted to think about a better solution. Also, servos attached right to the wings would be too obvious - I needed to get them into the backpack. I made a big paper with a lot of drawings of how the wings could be propelled, even my friends thought about some solutions, but I want to describe the chosen solution, that luckily worked for this build.
Just for fun, I'm sharing 2 solutions, that weren't brought to real life:


 I knew I would also have to programm a lot to make the wings move up and down and there was no way to adjust the speed of them. So I've thought: what is affordable, has batteries and a turning motor? And I thought about an aku drill.
 An aku drill has a button, that controls the direction of turning, and the intensity of turning (speed). It even has a position, that functions as safety-pin.
 This drill can turn a big screw with a female screw on it, that would go up and down depending on the turning direction.
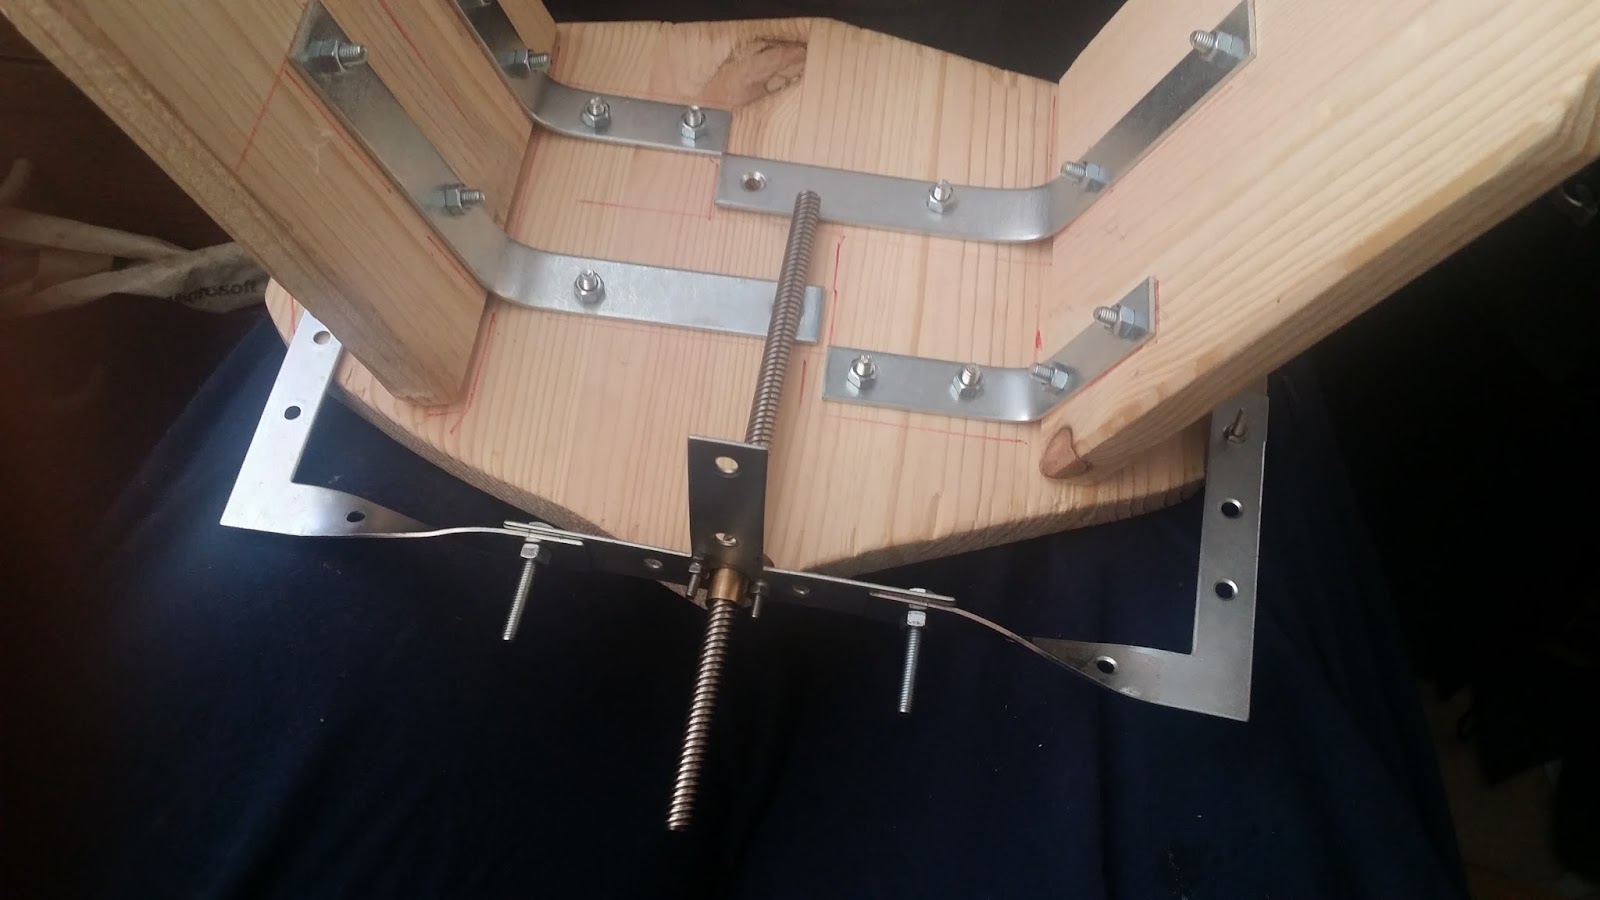
 I've bought an old drill with two akus and thought immediately, that the aku is really really big, But I eventually installed it into the hood compartment on the backpack. I removed the motor and the multifunctioning button, noted the right wiring and cut them apart. I bought strong wires and built the button from the drill into one of the backpack straps and covered it with foam. The wires went from the straps right into the battery on the top of the backpack and into the drill motor. The I bought some metal reinforcements, from which I made a construction in a U shape. I had to drill holes in them and fasten them to the screw nut. I reinforced the construction with worbla scraps and later I reinforced it more with black worbla for better strength.
 Please, don't mind the rails on the sides of the wing construction. I removed them eventually, they wasn't necessary and they sometimes obstructed the movements instead of smoothing it out.
 I drilled holes on the sides of the wings and throught the holds ran a cord, that was fastened to the U construction with a keychain circle. I had luck buying a cord, that could be burned and I could easily make a small discs (stoppers) from burnt material on the end of the cords.
 I destroyed the ends of the big middle screw not to lose the important screw nut from it. Yeah, and I bought the screw HERE. I fastened it into drill motor and the drill motor I fastened to the wooden base. It it REALLY important to fasten it good, because if the motor or the screw will move, the wings could open unevenly or not at all. So I glued the motor to the base, I fastened it with glued foam, Metal reinforcements and I screwed small screws into the motor (careful - screw only in plastic not to destroy the insides from the motor).
 For the battery to be replacable, I made a little case for it from foam, black worbla and strong rubber bands connected with velcro. As a B plan, I always carry a 9V battery inside my backpack, that could be connected instead of the big battery to propell the wings for a few times (the drill motor needs 13,5 V).
And for the smoothest opening, remember, that the main screws have to have two brass washers.


Backpack


The backpack is just for covering the wing construction and is there just for the looks. I made the base piece from toliet paper roll, I covered it in foam. Basically all the pieces are just EVA foam (1cm for the base, 0,5 cm for the smaller pieces) and craftfoam (for the smallest details - recognize it by black color). The exhaust base coveres the screw and the end of the screw ends in the round piece made out of foam and decorated with soldering iron. The hardest part were the pipes. The pipes have real piping ending parts from PVC (white) and I failed to insert real tubing into them, because it wasn't flexible enough. So I glued 2 1cm foam pieces together and dremmeled them into a rounded shape, glued to the piping endings, and then just painted with acrylic colors.
The backpack is assembled from two pieces. This bigger piece is covering the drill construction and can be diassembled. The upper part, that covers the battery is glued to the wooden base and wing cosntruction and is connected to this backpack piece with velcros. I also used velcros to connect the backpack on the side to the wood.
Summary
Oh, I know, even I did all I could to explain all the pieces, that went together to make the wings move, it still seems kinda too hard to get. So I made this to help you out, guys :)This is me disassembling the wings after wearing them showing all the pieces, that go together and how they go together ;)
I hope this will help you on your future projects and if yes, you can follow my work on cosplay (and other stuff) on my FACEBOOK PAGE.
and if you like this stuff I do, you can support my work by donating on my TWITCH CHANNEL.
Yours
Germia <3

This has saved me hours and hours of time and was super helpful. Thank you so much.
OdpovědětVymazat