 |
| Photo by Photo Czarny |
1) Why I chose to make this costume:
I admire nordic mythology, especially Valkyrias, winged female creatures choosing the souls of fallen brave soldiers for Valhalla. I wanted to do an epic Valkyria for a long time, but I wasn't succesfull in finding the right model or design for me. I dont' like naked designs and I searched for a badass armor.As soon as I laid my eyes upon the female might hero from Heroes, I fell in love and I had to bring the design to live. It was the challenging project I was looking for and a form to pay tribute to a game, that isn't cosplayed very often, even the desings of the heroes are so epic.
ORIGINAL CHARACTER:


2) How I made this costume:
1) Helmet
 I made the headcast of my head following this youtube tutorial, covered it in food foil and adhesive tape. On the tape i drew the shape of the top of the helmet, cut it into pieces and transfered on 0,5 cm thick EVA foam. How to transfer a pattern onto a foam is great to see in this tutorial.
When the top of the helmet was done, I added the bottom part from 0,5 foam. For a better firmness I reinforced the top part of the helmet with a cotton fabric and woodluge covered than in latex cement - it's hard as worbla when finished.
The front decoration was made from 0,5 foam two pieces, that came together at an oblique angle with a fixed wire inside for better firmness. Then it was covered in brown worbla, covered in latex cement for smooth surface and decorated with blue handmade fussing glass cabochon in a moosgummi bezel (decorated with turquoise pearlescent nail polish and sticked on the blue moosgummi on the bottom part and black moosgummi on the sides) and EVA foam "wings". Other decoration were made from mossgummi and EVA foam in worbla and they reinforced the helmet some more. On the bottom of the helmet's sight-hole I added a small corset reinforcement to hold the sides of the helmet close together.

Then I made the big wings on the back. First I made the base from moosgummi-worbla sandwich. The I drew the shape of the feathers and made them out of black worbla sandwich on back side and out of moosgummi on the front (only in the middle - because of weight and because it already holded it's shape really well, so there was no need for more worbla). It holds on the helmet thanks to two rivets made out of worbla leftovers, that go through the back on the helmet and thanks to chemoprene glue (barge).
The whole thing was painted with black, silver and gold color with my painting technique (more info about it by bracers).
 2) Pauldrons
The pauldrons are made from 1cm thick EVA foam with one strap arounf the shoulder, one strap connecting behind the necj to each other, one strap holding the biceps armor and one strap, that goes through breastplate. Everytime I try to fasten something to EVA, I underglue it with fabric first, because foam is easy to tear. I also added some padding from yogga mat to make the pauldrons appear higher and to make them better sit on my shoulders.
Then I drew the feathers and sandwiched them from mossgummi and black worbla
The small mini feathers are made from dremmeled EVA foam 0,5 cm thick covered in black worbla. It's painted with silver, gold and black acrylic colors.
3) Breastplate
 I wanted to make the breatplate really firm to hold it's shape, so I've chosen regular worbla to do this job. I covered moosgummi from one side with brown worbla and the breasts are made from pattern from an acrylic ball. The pattern was divided into 4 circles and I hoped it will make the cricle structure like on the game design. But after painting in, I've realized I had to make the circles stand out a little more, so I did it first only with acrylic colors and then remade it with moosgummi and colors (second picture). The worbla is primed with latex cement and decoratd with EVA foam (0,5 cm), moosgummi and blue fussing glass in moosgummi bezel. The breastplate could be laced up like a corset on the back.
4) Biceps armor
 This armor is made out of EVA foam and the golden borders from moogummi. It holds with velcro on the top to the pauldrons, and one velcro around the arm. The wings are 0,5 cm EVA foam dremmelede in the shape of the wings, then covered in black worbla, primed with latex cement and painted with acrylic colors.
5) Corset

It's made out of black leather reinforced with sew-through corset reinforcements. I made the pattern from paper and tried it on myself. I sctually made it too short first (see picture with boob armor), so I had to add a layer on top of the corset to look good. The scales are made out of leather too, then glued to the leather with chemoprene glue (contact cement, barge). Then the scales are painted with silver acrylic colors.
There are two velcros on each side of the corset, that hold hip armor and one velcro on each side, that hold the knee armor. In the middle there is one more velcro sewn from the inside, that holds the skirt and one from the outside, that holds the belt buckle.
6) Knee armor

For better mobility the parts are fastened with elastic bands, that stretch when the knee is bent. I've used some rivets to hold the parts together - you can see them from the side.
It's made out of black craft foam (moosgummi) fro the borders and Eva foam underglued with black fabric for better durability. The scales are made out of black leather, hand-sewn, painted with acrylic colors.

7) Gauntlets
The gauntlets are made from black satin gloves i bought on e-bay. I made them from moosgummi and black worbla sandwitch and glued them with hotglue onto the gloves. Then I made the upper part from EVA foam 0,5 cm thick, primed the fingers with latex cement and painted it black and silver with acrylic colors.

8) Bracers
The base of the bracers is made out of 0,5 cm EVA foam and decorations are from moosgummi and acrylic rivets. From the inner side there is a velcro, that connects it around the arm. It is painted with acrylic colors and how I did it you can see in following video tutorial I made:
9) Ellbow armor

A little insight in how I think about each part of cosplay can be seen on the picture - what materials to use and how to connect the pieces to hold on their place and allow me to move. This is one of the hardest parts of cosplaying - how to make something irl and make it function, look good and be still true to the original design.
For this elbow armor I've designed a three part construction from EVA foam, moosgummi and fabric connected with elastic bands to allow me to bend my arm. It could be opened and closed with velcros. Thanks to the three part design it allows me to have great mobility.
 10) Shin armor
The shin armor was made the same like biceps armor - EVA foam for the base, moosgummi for the decorations and borders and black worbla with dremmeled EVA inside for the wings. Two velcros then connect it on the back side.
After making it, I enhanced it with foam padding, that shaped my leg better, because I have really slim calfs.
 11) Boots
I bought black boots from fake leather. I've searched some, that are not on high heels, but not flat - so the heel looked feminime, but was not overly sexy, I guess.
The boots were a little wide on the top, so I had to sew it to fit thight on my leg. I hid the sewed joint with black leather.
Then I made the pattern from food foil and adhesive tape, drew the pattern on it and then transfered it on 0,5 EVA foam. Then I glued the construction on the boot and decorated it woth moosgummi. I painted it with acrylic colors.

12) Biceps padding/gambison
I've bought a jacket for kids in a second hand store made out of quilted black fabric and I used it for the sleeves of my cosplay.
I sewn it in hand and use faux leather for the borders. It holds on its place by one velcro, that connects onto velcro on the biceps armor.
13) Hips armor

Hips amor is made out of 0,5 EVA foam, dremmeled on the sides (I dremel every piece od foam and every piece of moosgummi just to have round edges). Even the feathers are made out of foam, border decoration is made out of moosgummi.
From the jacket I used for the gambison sleeves I've used the pockets to make some place for money and necessary stuff on the inner side of the armor.
The whole armor holds on its place thanks to velcros, that connect to the corset.
 14) Skirt
For the skirt and cape I bought a woolen fabric in the red-orange brick color, but when it arrived I realized it's too orange, so I had to dye it some shades more red. I spent the whole day dying this heavy fabric. I cut the shape of the skirt from it and since it's from two colors, I had to dye one layer a little darker (red-brown)- I dyed it with spray-on color for fabric. I handsewn the whole thing and decorated it with golden ribbon. It holds with velcro on the corset.
 15) Cape
The cape is made out of woolen fabric, that I had to dye to be more red. I measured it and cut to fit me. It holds with two opening hooks, that hook into breastplate. I handsewn the whole thing and decorated it with golden ribbon. The cross on the back was visible only in the game, so I had problems to make it accurate.
And to make sure my cape will be always spread wide with the cross visible and not just a crumpled piece of fabric on my back.
A small hole in my pauldrons and two bra hooks on each side of my cape hold the shape of my cape just fine.


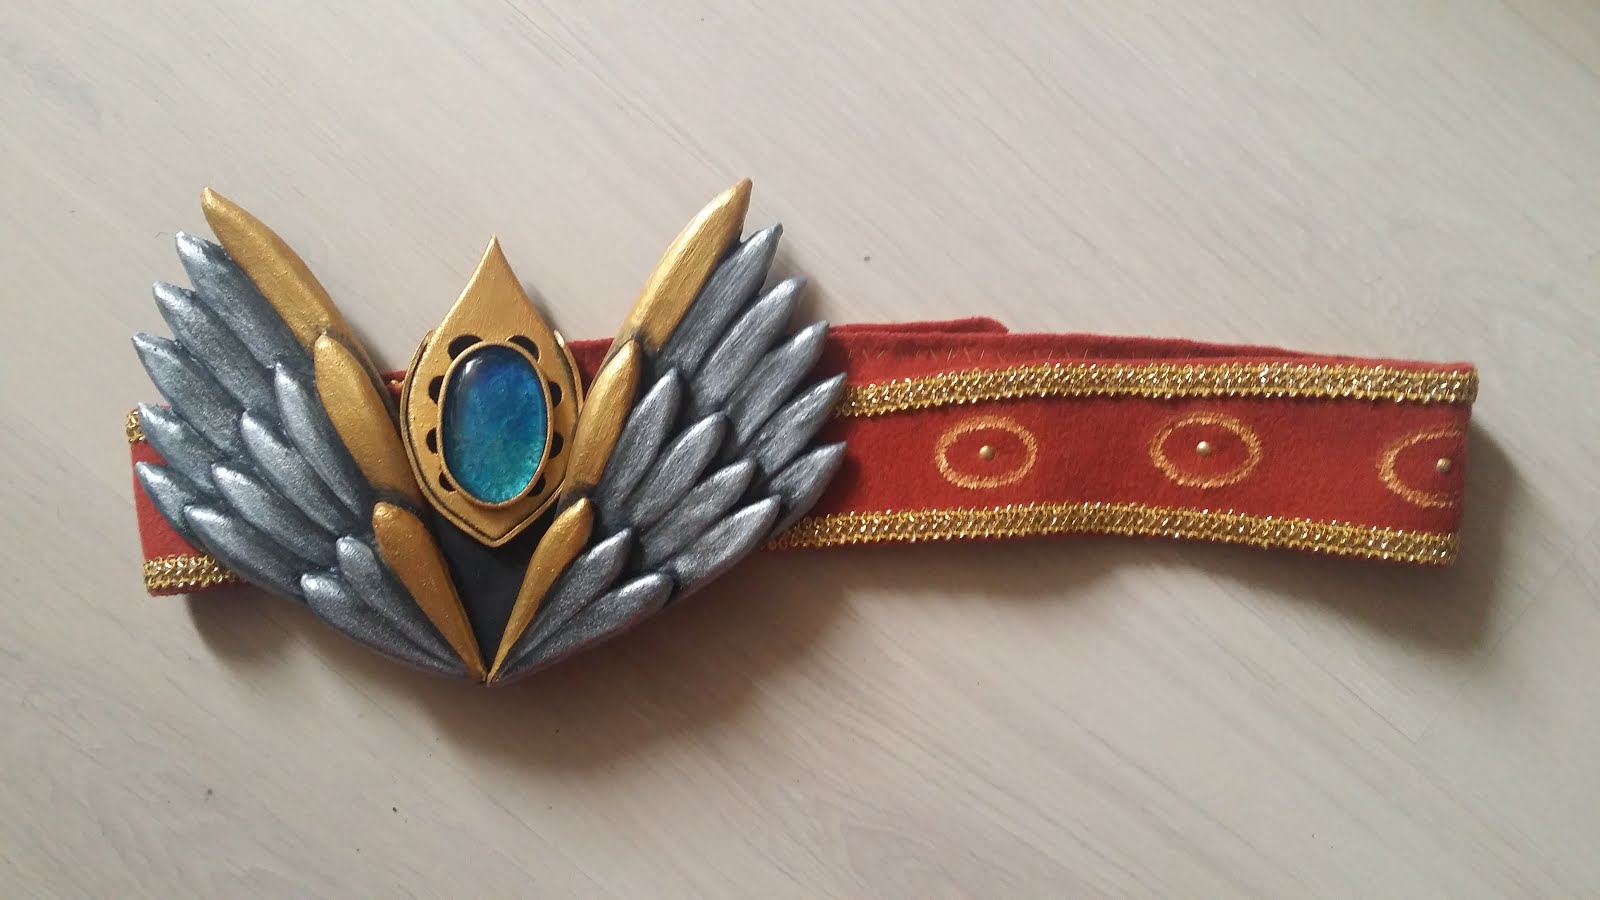
 16) Belt
The middle part is made out of black moosgummi and EVA foam 0,5 cm and hand made fussing glass cabochon. The feathers form EVA-black worbla sandwich. Then it's primed with latex cement, painted black, silver, gold and shaded with black acrylic paint, underglued with fabric and moosgummi with black velcro.
 The belt is made out of wool fabric in brick red color, painted with textile colors, embroided with gold ribbon, decorated with gold rivets and gold paint. The buckle holds on the belt thanks to keychain rings and worbla strap and because worbla sticks to itself.
17) Sword
 1) - Shape of the sword cut from plywood (0,5 cm)
2) - 4 layers of Starlon polystyren glued with Duvilax wood glue (But I would totally use the grey extruded polystyren for my next projects!)
3) - 3D shape cut from Starlon using exacto knife
4) - Lot of papiermaché layers for harder surface
5) - Black acrylic paint to make the bulky surface easier to see
- Electronics, that make the sword shine
6) - Latex cement for smooth surface
7) - Red leather glued to the handle with chemoprene glue (barge)
- EVA foam (0,5cm) and Moosgummi (0,2 cm) added for the whole decoration and wings part
- Blue glass cabochons added and runes in the blade engraved using engraving tool
8) - Painted the whole sword black as a base color
- Used different shades of silver, gold, black and brown colors to achieve the final look.


18) Accesories
Paladin Ymoril has a greenish eye color and I have brown, so I had to use contact lenses. I recommend looking in my contact lenses guide for that.


 She has red short hair with two braids coming back, so I had to buy a longer red wig (I wanted the wig to look natural, so if you're buying wig on e-bay, try to buy the wig with real-looking pictures and not stock pictures). I then cut the red wig to be shorter and the remains I used for the four braids. I've glued and sewn the braids into the wig. Keep in mind, that if you're wearing wig, you have to make a larger helmet. One more thing to add is to choose the right makeup - paint your eyebrows with red lipliner to look good with the wig and choose the right make-up color to your look (bronze colors, natural lipstick).
On top of that, don't forget to have bobbypins for fastening the wig to your hair.
And as it is with all other shining cosplays, bring a lot of batteries with you :)
 MATERIALS:
Led light: http://www.ebay.com/itm/182050867647?_trksid=p2057872.m2749.l2649&ssPageName=STRK%3AMEBIDX%3AIT
Battery bezel: http://www.ebay.com/itm/10PCS-CR2025-CR2032-Button-Coin-Cell-Battery-Socket-Holder-Case-Black-for-Arduin-/121299198835?hash=item1c3dfee373:g:TxIAAOSwe7BWxA7K
Battery: http://www.ebay.com/itm/5PCS-for-Watch-Toys-Remote-CR2032-DL2032-LM2032-3V-Button-Cell-Coin-Battery-HS-/371336774348?hash=item56756582cc:g:69oAAOSwv0tVZWQX
Switch: http://www.ebay.com/itm/DZ203-Mini-Slide-Switch-SPDT-2-0mm-Pitch-2-Tap-Position-3Pin-20pcs-/131319659615?hash=item1e9342fc5f:g:JrgAAOSw8cNUOUMA
Wig: http://www.ebay.com/itm/Crell-Sutcliff-Cosplay-100CM-Long-Wine-Red-Synthetic-Hair-Lolita-Party-full-Wigs-/131765681257?hash=item1eadd8bc69:g:9LQAAOSwI3RW-i8H
Lenses: https://www.vasecocky.cz/colourvue-fusion.html
Gloves: http://www.ebay.com/itm/Fashion-Satin-long-finger-gloves-opera-wedding-party-dress-costume-Gloves-/301350310976?var=&hash=item4629e0d440:m:mMcxfh84NL1euTHOiPHbEoA
And there are some pictures of my done cosplay :)
And if you like it, please follow me on my FACEBOOK PAGE for my new work, please!
 |
| Photographer: Photo Czarny |
 |
| Photographer: Radek Vebr |
 |
 |

0 komentářů:
Okomentovat